It's a BEAUTIFUL day here today! It's supposed to get into the high 80's today!!
I wanted to come & share a few projects I've been working on the past week or so for the Urban Anthology Desgn Star Contest.
The first is for a bonus challenge. We all had to create sketches for a previous bonus challenge, and for this challenge, we had to choose one of the other designer-hopefuls' sketches & create a card!
I chose the wonderful sketch that Kimmy (lostinadream) created!
 I love the "sun burst" background! I saw it as a great way to add color & dimension to the card, without making it too bulky for mailing! Also for this challenge, we had to have at least one hand-cut element on the card.
I love the "sun burst" background! I saw it as a great way to add color & dimension to the card, without making it too bulky for mailing! Also for this challenge, we had to have at least one hand-cut element on the card.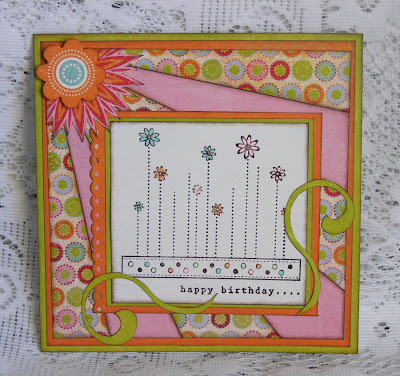

 Hand-Cut Items: Flower burst in the top right corner, Flower in the top right corner & flourishes around stamped image... all hand-cut from the BG Patterned Paper. The flourishes were traced from a doodling template, then hand-cut. Sunburst background was sort of like a paper-piecing... I had to measure & cut both the dot paper & solid pink, ink them & piece them together & stick them to the orange paper then finish assembling the card from there.
 Supplies used for this card:Basic Grey (Romani) Patterned PaperStamp was purchased at AC Moore, but the manufacturer's name is too small for my eyes! LOLSakura Souffle' PensTim Holtz Distress Ink (Walnut Stain)Stampin' Up Clear Embossing Powder (Image was stamped then heat embossed to add texture... more texture was added by filling in the flowers with the Souffle' Pens)
~*~*~*~*~*~*~*~*~*~*~*~*~*~*~*~
For the next challenge, we had to create a multi-photo layout that incorporated two innovate & unique techniques... not easy! LOL The two techniques I used were to create an "etched glass" look on an extra acrylic album sheet (used on the "overlay" over the photo on the left page) & use it as an overlay. And, how to jazz up basic, boring, die-cut letters & shapes, using embossing & stamping (used on the title, flourish & circles... these were all cardstock/paper die cuts... not chipboard!).
My layout is an 11 x 8.5 2-pager for my Winery album.


 Here are some of the design details from this layout...


 Supplies:Bo-Bunny Patterned Paper & Die Cut Circles & Flourish; Prima Grape Vine Leaves; Misc. Floral Wire; Misc. Mosaic Beads; Glass Etching Stencil or any stencil (you can even make your own!); Stampin’ Up Emboss Puff “Whoolly White” Embossing Powder; Stampendous Deep Impression Clear Embossing Powder; Top Boss Embossing Pad; Color Box Gold Pigment Ink; Heat Tool; Tim Holtz Distress Ink (Walnut Stain); Kaiser Pearls White; Tim Holtz Alcohol Ink “Eggplant”; Extra page from 6x6 Acrylic Album; Misc. StampCraft Glue
 Here are links to slideshows of the tutorials for both of the above mentioned techniques used on this layout. To view each step, just click on the photo in the slideshow.
Jazzing Up Die Cuts:
Creating "Etched Glass" Effect on Acrylic:
Well, I think that's it for today! Thank you for visiting!!
Have A Wonderful Day!!


1 comment:
ROBIN! I LOVE, LOVE, LOVE this layout! What a FANTASTIC job!!! LOVE the etched-glass look! That is AWESOME! LOVE all the details, this is SUCH a beautiful layout!
Enjoy the rest of your weekend:)
Post a Comment